Friday, May 30, 2014

How I Made My Plein Air Setup


I've had a number of people ask me about my plein air set up, so I've taken the time to outline what I've put together, how I carry it around, how much it cost, and where I got my inspiration from.  May it help others as much as I've been helped by a number of other internet resources.

So, I really liked the Plein Air Pro Traveler set up.  This company produces a nice (and niche!) product, but I didn't have the 200$ that was needed to get their product.  I also found this video of Vinita Pappas going over her plein air set up.  Looked great too.  What's a boy to do?  Combine the two and go about making my own!

It's all very doable, but it'd be a lie to say there wasn't some blood, sweat, cursing, and power tools involved.  Still, if you've got a jigsaw and a power drill (or you know someone who does!), and some gumption, you ought to be able to accomplish atleast the basics of this plein air easel set up (minus the palette, brushes, stool, and backpack-- just the required easel) for about 60$.  As for myself, I admit... I was excited by the challenge!  In the end, it really was only a few winter evenings in the garage by myself, experimenting mad-scientist style.  :)  Besides, there was something about building my own plein air easel-- I felt like I was making my first light saber!  LOL. :D

First, for about 20$ I got the same light-weight collapsible tripod that the Plein Air Traveler uses-  the Sunpak 2001 UT.  It has a quick release switch, which I use to quickly attach my paper and backing to the tripod (more on that later).  It also has telescoping legs that allow each leg to be variable in length (helpful when the ground is at a slope), as well as the triangular support in the middle.  The head is also rotatable in all directions, which is very useful if you want to alter the angle of the paper, etc. 


It's quite light, and compacts nicely.  It's only 19" long when folded up.


It just fit into my slightly big backpack, if I tilted it sideways and stretched the zipper.  If I had a satchel, it would have fit easily in that, and not weighed much at all.

I also got a REI camp stool for 20$, which I don't use for painting (I paint standing up), but rather for resting and setting things up.  It's a little longer than the tripod, and had to be attached to the outside of my backpack, in the water-bottle carrier, until I got my new (bigger) plein air travel backpack, which I'll go over later in the post.


Attached to the front, I used the basic shelfing idea of the Plein Air Travelers Easel as inspiration.  I bought a piece of 1/4" thick plywood at my local hardware store for 15$, and cut it into a 10" x 14" block-- I basically mimicked the size of the Arches watercolor block I've been using for plein air work, so it packs easily.


On the back, I cut an additional piece, about 4" x 14", and glued it to the big piece for reinforcement.   More on the metal pieces in a minute.


Once they were wood glued together, I cut out that upside down "T" shaped section so that it would be just a little bit wider at the mouth than the tripod is at the top of the legs, where they come together.  This allows me to put the shelf into place and slide it down the legs, until the shelf keeps itself in place as the legs get farther apart and go into those two notches.  How long is the widest part of that "T", where the legs end up fitting?  Depends on how tall you are, and how far down you want your shelf to rest.  A taller person would probably have a skinnier "T", so the shelf would stop higher up.  A person who was shorter (like myself) would have a wider "T", so the shelf will slide down farther.

What was important was that the top of the upside down "T" (the area where the tripod legs rest) be only 1" wide.  This is because legs are only 1" wide.  If you make the top of the "T" section 1.25" wide, for example, the whole shelf will tip dangerously forward.  The goal is to have the width of that top "T" section be almost exactly the same width as the tripod legs.  Then they match each other, and the shelf doesn't tilt forward.

Unfortunately, once I got this set up other problems began to occur.  The metal of the tripod legs were digging into the wood bit by bit, as I used the palette and weight was applied to it, and this was making the shelf tilt more and more forward.  I tried reinforcing the area (thus the double 1/4" plywood section), but this didn't solve the problem well enough.  Instead, I used a long "L" piece of aluminum (available at your local hardware store for 5$ or so), cut it into little sections, drilled a couple of holes in them with a normal metal power drill bit, and screwed it into place. Alumnium is light weight, strong, and easy to work with.  That has solved the problem, and I've been using the shelf for months.

In the process of iterating, I actually made two of these shelves.  This ended up being an interesting mistake, because I now have two shelves that sit at different heights, if I want to use both.  I don't do it all the time when I pack to paint plein air, but in the house I sometimes use both, like this--


One sits higher than the other because the slot where the legs fit are a different width, like this--


They both are reinforced on the back, around the "mouth", with an extra piece of 1/4" plywood.  This means if I place them "back to back" they pack together well, like a little Tetris set.  A nice accidental benefit!  Altogether, the two of them add up to about 3/4"- 1" in width, when packed.


I also made a little mount for the tripod.  This is based almost entirely on Vinita Pappas methods, and is basically the one essential thing you've got to figure out.


That little black piece is the "quick release plate" for the camera tripod.  Two of them come with the tripod, but you can buy replacements if you want.  It fits into a little area on the tripod head itself., with a lever to... release it quickly!  This is what it looks like on the other side--

Cameras have a little threaded slot on the bottom which is where you attach it to that screw that's sticking out.  Basically, we have to make that slot, so we can have a way of attaching the tripod to the backing/block, etc. Taking Vinita Pappas' advice, I bought a T-nut (a special kind of special inside-out screw that you can get at the local hardware store for something like 1$), which looks like this--


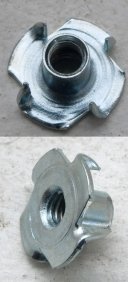
I then drilled a hole through the little glued-together base of 1/4" plywood you see up above, and then tapped (with a hammer) and glued (with Gorilla Super Glue) the T-nut into place.  Once it dried-- voila! I had a threaded female piece available to attach to my quick release plate.

How, you ask, do I attach my backing to all this?  Why, on the other side of that little 6" x 6" block of 1/4" plywood is a few pieces of fuzzy velcro.  On my block or Gator Board is the other half.  Wanna know where I got the velcro strips?  You guessed it-- at my local hardware store for something like 5$.


Notice, btw, how I have 4 strips on the base unit, but only 2 on the Gator Board.  Having 4 on the base allows me to rotate my board any way I want, and there are always two appropriately placed velcro strips waiting for me.  You can also see the remnants of that little hole I drilled into the base unit, where I attached the T-Nut.  If you looked into the hole, you would see the butt-end of the screw which is attached to the quick release that came with the tripod.

After all of that measuring and  gluing and cutting and drilling, the rest is pretty straight forward.  This is what I keep on the shelf.  Yes, that water container is a collapsible dog dish from the pet food store.  I got it for something like 7$.  I keep a sponge (2$ or 3$ at the grocery store for a pack of 3) next to it for dabbing excess water off my brush, and I place my brushes in between the two-- so they don't roll away.


My watercolor palette is small and easily held in the hand.  I bought it from the Ken Bromley website.  They call it the New Compact Watercolor Palette.  It's pretty cheap (about 20$, plus shipping), has good sized mixing wells, and a reasonable number of spots for paints.  Issues?  It doesn't seal very tight, so I keep it in a zip lock bag.  I often get paint on my fingers when I hold it, while open.  I also wish it` had more mixing areas.  Still, for 20$, it's been wonderful.  A great introduction for plein air painting.


But I'm probably going to end up getting this new palette eventually, the Cloverleaf Paint Box, which runs about 50$.  It has a spot for my thumb to go, in the way I like to hold the palette, has more mixing wells, has more pans for paints, and yet is basically the same size.


For the sake of sharing, these are my brushes- a big 5/8" Davinci Squirrel Mop, a smaller size "0" Squirrel Mop (about 1/4" round) from Alvaro Castagnet, and a Needle Point, from Castagnet as well.  The Castagnet products are located here.


I was using a normal backpack for a while, but it was really snug.  Besides the brushes, this is where I ended up splurging, and I got a really nice backpack for travel.  It's a North Face "Router", and is tall enough to easily fit both my tripod and travel chair in its primary compartment.  It has a separate back compartment that is 12" wide (instead of the normal 10"), which means I can now fit actual quarter sheets of loose paper in there, along with Gator Board or some other backing.  Before, I could only fit small Arches blocks (10" wide or under), but this allows me more flexibility in my choice.  The many other pockets provide space for all my painting supplies, and even room for lunch.  !! Very important.  :)


Sunday, May 25, 2014

My Alvaro Castagnet Workshop Review, pt. 4- Painting Figures the Alvaro Way


As I mentioned in the last post, to Alvaro, getting the human figures right was an exceptionally important element of urban plein air painting, mostly because people were almost always at the focal point.  He had helpful criticisms about buildings or cars or trees, as well, of course, but if your people were terrible, it would, in his opinion, ruin the whole painting.  I agree.  I've ruined a few!!!  :D   He really did say something like "Go and paint 2000 figures-- then come back to me!"  It sounded absurd, but how else are you really going to learn, without doing?

He didn't just leave us hanging though.  He gave us tips, and did a demo!  It was fascinating to watch!  This pic is from that, very quickly done.


Of course, he sometimes did figures in greater detail, but for this demo, this is what he did.  He smooshed down a couple of messy brushstrokes, just scribbles really, then went about carving figures from them.  It was very important to him that you wed your figures to the image, and to each other-- so he was not particular about us needing to paint each figure separately.  What was most important was that the figures not feel "pasted on".  In fact, he painted the figure in the middle (which I quite liked) to show us something he felt was a bit too "illustrative".  Instead, he instructed that the figures should be painted together, as a unit, when possible.  He would often push this sort of broad structural brushstroke into his paintings while doing other dark shadows (on buildings and cars, etc) with his second wash.  Then he would leave it there, only to come back to it later and use that tonally connected "smudge" for the bodies of his people.

First, he would create the angles of the shoulders if need be, a head on top with orange for the face.  Down below, the suggestion of legs were added with dry brushstrokes, often with one shorter than the other, to suggest motion.  Then he'd drop shadows in to relate them to the ground and surroundings.  He would sometimes add a brightly colored tie, to signify a torso, or a scarf or handbag or dress, etc .  Other times, he would apply a thick opaque application of white or a rich, high chroma color for a shirt or hat as well.  The point was to let us know it was a human, and for us to relate to them, not for us to get caught up in "superficialities" that overstated the obvious.

On an ergonomic level, they were supposed to feel alive, walking, off balance.  In motion.  Most figures we painted "were too static", he suggested.  Interestingly, rather than spending a lot of time making them "just so", Alvaro expressed this being-alive feeling by doing the opposite, and not overworking the figures.  You need to have enough there to understand it's a human, you need to suggest movement and action through posture and titling, but his recommendation was to let watercolors do what they do best, be fluid and textural and expressive, and only suggest the specifics of the human form in motion.

We went out that afternoon, to Pier 1, and everyone atleast spent a little bit of time working on painting figures, direct from life.   I did these, which showed a mild improvement, then moved on to the whole scene.


He recommended doing rough charcoal sketches of people from life, to understand posture and weight, and only then to go about painting them.  In his opinion, we ought to be able to do at least a couple every minute.  So when he said "Paint 2000 figures!" I think it was more about getting acquainted with the human figure in watercolors, not somehow to spends months and months just painting figures.  So, well.... a week after the class ended, I went back to Union Square on my own and did some sketches.  I produced gestural figures like these--


Each one took about 10-20 seconds.  I filled about 4 or 5 pages in an hour, dawdling about.  I actually really enjoyed this, as there were kids there, families, business people, tourists, etc.  A lot of different subjects.  I actually wish Alvaro included a wider variety of people in his paintings-- there are very few figures in his paintings that are clearly children or families, for example.  They mostly seem to be businessmen and women, or often workers.

Anyways, later that week, I went home and painted my sketches one evening.  It was good to just explore a single aspect of a painting for a while, experimenting and practicing only figures (doodling really), without the weight of having to get them just right, in a proper painting, where I might be prone to being too careful.  It was a good way to mess up, practice, and learn, while being free of fear.  From that experience, I got this--


Not bad all in all, I felt.  Definitely better than before, at the very least.  ;)

Later on, in May, I was talking in my watercolor class about Alvaro's workshop, and how he did his figures.  What was neat was that without much effort, I scribbled out these little paintings.


They're not the Mona Lisa, but they expressed some of what Alvaro had been trying to teach us.  I feel like I'm beginning to get a handle on some of it.  Sadly, it's only now that I feel like I'm ready to take his workshop!  Hahahaha!  :D

Friday, May 23, 2014

Alvaro Castagnet Watercolor Workshop Review, pt. 3- His Approach, Quotes, and Tips


I'm going to be sharing some of Alvaro's tips and quotes in this post, but I wanted to start with a few "teacherly" stories about Alvaro first.

Of course, Alvaro did all the normal stuff-- introduced us to his tools, the pigments he used, talked about his process while painting, etc.  Which was good and all, but not where he really shines.  However, these two little spinets are when I thought Alvaro was at his best as a teacher-- improvisational, unplanned, very direct and honest, funny some times, a bit edgy and brusque perhaps at others.

My Two Favorite Sessions-
One day in the first workshop, we were in China Town.  Alvaro had finished his second painting of the day, and seemed a bit tired.  We decided to do the group critique right there, on site.  He finished, then we all just sat around in a circle in the shade and talked and talked for another 45 minutes.  The conversation was intelligent and full of fervor.  People asked Alvaro about other favorite artists of theirs, Andrew Wyeth, about Alvaro's techniques, etc. all sorts of random stuff.  It was a fun, invigorating, and above all illuminating conversation that was totally natural and unforced.  I loved it so much, I went home and chatted with my wife about it until she got bored!!  :D

So, in a nutshell, that's the kind of teacher he is.

Later on, it was Sunday, the last day of the second workshop, and Alvaro kept us at the Raddison Hotel and sat us all down.  It seemed like an impromptu decision, one that had been made perhaps only that morning.  We weren't going to go out and paint until the afternoon.  Instead, we needed to go back to basics for a while.  He seemed grumpy, but in a determined sort of way.  Why were we still painting on big 1/2 sheets with little brushes?  Why were our figures so terrible?   (And they were, honestly....)  Why were we painting all these separated little objects, and not big washes and shapes, as he advised?  What was the point in going out to watch him paint, if we didn't have control of the ABC's yet?

He had us gather around one of the tables.  He got his paints and some paper out, taped it down, and and proceeded to give an impromptu, whirlwind two-hour master class on The ABC's of Watercolors, and what we'd need to do to start using them.  I told Kate it was the best watercolor class I'd ever had, and I meant it.  It was incredibly helpful and instructional.

It was totally, almost brutally, straight forward.  He wasn't being mean-- there was just nothing sugar-coated about it.  He didn't single people out and belittle them.  He was just being completely honest as he spoke to the group.  In my opinion, he gave us everything he had to offer that he thought would help, even if it was really basic stuff.  I'll be straight forward too, and say this is where I'm sure some toes got stepped on, but it was the kind of frank conversation that an adult would only have with someone he respected enough to tell the God's-honest truth to.  For me, he wasn't there to be my friend-- he was there to be my teacher, and the lesson was just the sort of direct (if perhaps occasionally abrasive) helpfulness I needed.  It was awesome.  I'd pay to go back and do it again.  It was easily my favorite teaching moment of the week.

First, he slapped these colors together.  "This is the DNA of watercolors!" he said.  "You must always be searching for polarity- pale and dark values, warm and cool colors, grays and chromatic colors, hard and wet edges, washes and dry brushstrokes, large and small shapes."  Push and pull.  It's completely abstract, but it works for me.  It's definitively Alvaro.  ;)


Next, he painted this little piece to illustrate the need to escape from illustrating, from painting only objects, only what you see.  We needed to go beyond painting objects, and start painting shapes, washes... values.


Then he did this tiny, abstract little beach scene, with some mountains in the distance.  It took only  a few expertly place brushstrokes.  "It's like golf," he said.  "The painter who says what he needs to say with the fewest strokes wins."  Who was it that said "Brevity is the heart of elegance"?  It was the same lesson here.  He let the color mix on the paper, instead of overworking the colors in his palette.  He painted the simplest silhouettes of figures and gave us a focal point, a story, and was done.


He did a value sketch for us too, from a photo someone gave him on their iPad.  Sadly, I forgot to take a picture.  It was very instructive to see him to a photo and turn it into something related to the original image and yet altered, expressed through himself.  He blurred some edges and kept others hard, darkened some values and lightened others back up a bit.  He was clearly approaching the medium as a watercolor artist.

He ended though with these rough, expressive figures that he "scribbled" out.


"You can hide a lot of mistakes in a painting, but your figures must be perfect!" he said.  "Go and paint 2000 figures, then come back!"  We laughed because it seemed so exaggerated but it's really actually true.  I'm going to talk more about how he painted figures (as well as show some of my own, in process) in the next post.  It seemed that important to him.

All in all, it was a wonderful lesson.  I only wish he'd done it sooner!  :)


My top 10 Alvaro quotes-
(these are all paraphrased, of course)

10) Avoid illustrating.  Express the intangible, the atmosphere, the smell... the sound, the feeling of a place.
9) A painting is an illusion. Improve what you see through the channel of sentimentality.  You are here to improve on what you see.  Capture the mood, the feeling of a place.  You succumb to it- to color, to mood... to a feeling. Capture the intangible. Don't simply copy what your eyes see, they do it better. Capture the music, the poetry.  Paint with flamboyance!
8) Capturing the essence of life is capturing the _feel_ of the place, the magic, a feeling suspended in the ether, the _mood_. 
7) All things must be economical. Colors should be integrated. From a unified family.  Aim for harmony.  Draw shapes, not lines. Fewer brushstrokes. Be a minimalist.
6) Don't paint the object.  Paint the light that bounces off the object. Use your values, manipulate your darks and it will hold the light together.  Then the objects will appear. 
5) You have to create something a little twisted. A little broken. Be careful with your colors and use your greys.
4) Technique is like public currency. It's cheap. It's available to everyone. It's money!  It can be exchanged from one mind to another.  But there is something that cannot be exchanged.  That is art. You must have a vision! 
3) You won't believe me, but it's true- you have to be a little bit stupid to know how to paint. A kind of special stupidity, that is intuitive. Don't be too clever!
2) You have to paint abstract. Paint nothing, and hope that you end up with something. When I painted this area here, I painted nothing. I'm not painting objects. I'm just painting brushstrokes.
1) Have a mind that takes profit from the continuous mistakes you make.

Yes, Yoda!  :D   These are all good things to follow, IMO.


Notes on Technique and Composition-

4 things make a painting-
Edges, values, colors and shapes.  This was repeated many times by him. 

He uses a lot of opaque/ semi-opaque pigments- things like Yellow Ochre and Cerulean Blue, Holbein's Lavender, and Chinese White, etc.  Stuff he mentions in his videos. He often places this lighter, opaque value in thick chromatic applications over darker backgrounds to create highlights and pale valued objects.

Push and pull with chroma and contrast. He makes his brights brighter, and his darks darker, than they are in real life.

He recommends making charcoal sketches for students. Explore the value scale of the image you're going to make, play with the lost and found edges that charcoal (like watercolors) allows. Very essential. A good way to learn, and a good way to plan and have a goal in mind before you start the painting.

Paint only on a quarter sheet with a big mop (for the purposes of learning). Experiment. Paint big and be economical. Force yourself to think in shapes- washes and dry brush strokes. Bypass illustration.  Try to do a painting in only 20 strokes, just to see what you get!

Paint with fewer strokes. Try painting a tree in 4 or 5 strokes. A car in 2 or 3.  A person in just a few.  Let the brushstrokes have vitality.

Generally uses local applications of rich color close to focal point.  Pick a color for your primary color- use 2/3 for it, and 1/3 to complimentary color, or 80/20, 90/10, etc.  The point is usage of opposites to create polarity and richness.

He does the same with darkest values placed closer to the focal point, to draw the eye.

You must have a reason for the painting to exist. You have to give a story that resides at the focal point.  Something that you're sharing with the viewer.

Tuesday, May 20, 2014

Alvaro Castagnet Watercolor Workshop Review, pt. 2- My Paintings and Progress


I’ve heard people say that when you take a workshop, you should be prepared to paint horribly, because you’re learning new techniques that you have almost no control over.  Yeah, yeah… but we’re talking about me, right?  My paintings will be nice!  I like my paintings.  Well, the advice couldn’t have been more true.  Sigh.  So, I'm opening up my "painting diary" and will be sharing a lot of really bad paintings in this blog post before we get back to this painting above.  I just want to make that clear at the beginning.  ;P

But it all was worth it!!  :)

Alvaro approaches the painting process so differently that I ended up feeling like a frustrated newb all over again.  Most people only took one of the two 3-day workshops offered, but it took the full week of painting all-day every-day with Alvaro for me to get (IMO) just a beginner’s handle on the skills he was teaching.  The first 3 days were valuable, without a doubt, but having gone twice as long, I got exponentially more.  With the combined 6-day experience, I finally had enough failures and almost-successes that I feel like I’ve got some of the basic tools I need to help myself grow more on my own.

As Alvaro said, "Have a mind that takes profit from the continuous mistakes you make."

Well, I definitely made enough mistakes.  LOL! Time to take some profit from it.  


Before the Workshop-
So, I prepped myself during the month of March.  I read one of his books-- "Beyond Technique:  Painting with Passion".  I watched his DVDs (thank you public library system!).  I felt like a fanboy, but what the hell-- I wanted to learn what I could on my own, so he could teach me the other stuff.  I got a big Squirrel Mop Brush and built a plein air set up for myself.  I went out and painted.  And, well, this is the sort of terrible stuff I was getting….


Pretty dead.  Muted colors.  Blahhhh.  How did he do it?!? Clearly I needed help.


Day 1-
I admit that I’m the sort of fellow that believes I can achieve what I want through a combination of hard work, innate ability, and persistence. I love painting and have been building my skill set over the last few years.  I like the work I produce.  So, needless to say, it was very, very humbling to produce work like this on the first day of class…


It was just total crap, IMO.  I was completely unsatisfied with my work.  I wasn’t even really showing it to my wife.  What was the point?  This continued for the rest of the first 3-day session.  

Day 2 and 3-


What was interesting was that Alvaro strolled by as I was painting, and focused on just this little bit I did here, which was honestly done a bit by mistake and a bit through so much trial and error.


"This here is good!" he said.  "It has magic.  Wet into wet next to dry brush strokes!  And I like the letters you have drawn on the sign.  Do more like this.  This has magic!"  Yes sir!  :)

It's hard to get just the right consistency of paint to get that kind of dry brush stroke, but something was paying off, and sometimes there's a lot to be learned through experimenting and just trying things out and seeing what happens.  You discover things!  So I suppose I was getting better, bit by bit, but it was a lot of "two steps forward, one step back".  For example, at first I needed darker darks, but to get them my paintings became drier and drier, and less "free".  And then, my darks got so dark that everything I painted seemed like it was set at dusk. 

What I really needed was more time, more practice composing images, more control of the brush, a better understanding of the pigment-to-water ratio, etc.  As Alvaro kindly put it after seeing one of my value sketches, “You’re good.  It’s ok.  You just need more practice.  You need to paint more.”  Boy was that the truth.  By the end of the first 3 days, I felt like I was __just__ beginning to understand what I might need to do to make some better paintings, but had actually not yet produced anything even approaching interesting.  I went home, got to be a Daddy again for the day, and tried to think about something else for 24 hours.


Day 4-
It was time to double down.

The work wasn’t totally terrible, but it was still lacking a lot.  Composition was a very difficult thing to try and get a handle on.  I've painted a lot, from photos and assignments, but I'd never actually gone out, saw something, and tried to make an interesting image from the overwhelming mass of info the world was offering me.  Watching Alvaro do that again and again was incredibly instructive.  

People would ask why he didn't paint this or that thing, and he would reply with things like this, "I'm already painting once I start looking a the subject.  I know what I am aiming for before I even start.  I don't want to get bogged down in superficialities.  I only include those things that help create maximum impact!"  This is very Alvaro, and also very good advice.

Remove what is unneeded.  Once you've included what is necessary, to say what you want to say, then that's enough, and it's time to stop.  Reduce things to shapes of different values.  Paint shapes not objects. So, we weren't only learning brush technique (which I expected to sort of focus on)-- we were learning how to "see", and then construct an image.  Have a focal point.  Everything else guides you to that-- how you choose your values, your neutrals and high chroma colors, loose edges and dry edges, etc.


That night, I couldn’t sleep.  I had the paintings from Union Square in my mind when I woke up after midnight.  I sketched out what I wanted it to be like, then went to bed.  When I woke up again around 430/500, I figured it was time to just go and repaint the thing, now that I was acquainted with it.  I got this out of it.  Atleast it didn't look like dusk!  LOL.


Day 5-
We headed to China Town, and I finally had a bit of a break through-- the second of the two below.  A painting I was __almost__ satisfied with, and didn’t think was utterly terrible.  Yes!  The foreground basically screwed it up, but there were some successes in it here and there.


Day 6-
We painted down by Pier 1.  My painting were, at least, communicating.  They weren’t heavenly, but I could see progress getting made.  Of course, this is the sort of work I thought I’d be doing on Day 1, but atleast I could finally see forward movement!

I really began to follow Alvaro's advice-- "Small paintings, big brush! Small paintings, big brush!  Small paintings, big brush!"  It was like a mantra!  Hahaha!  So these two paintings are 1/8 sheet in size, about 10" x 6" each.  Really quite small.  I was using a 5/8" mop to do about 3/4 of the painting.  Quite big for the size of paper!  But it really helped me get past the details into seeing the more global shapes of the piece.  Good advice, Alvaro!


After the Workshop-
A week after the class had ended (a week full of a lot more paintings!), I went back out on my own to do some plein air painting in SF.  I produced this piece below, which I thought was much, much better. Still a long way to go, but I feel like I've got the tools I need to improve on my own.  It was quite an amazing, exhausting, often frustrating journey!  Phew!  I'm really glad I did it.

In the next post on the workshop, I'm going to share some stuff about Alvaro himself, as a teacher.  Some stories about how he approached painting, what he focused on with composition, some of my favorite quotes of his, etc.

Saturday, May 17, 2014

Alvaro Castagnet Watercolor Workshop Review, pt. 1


A month ago I finished up a week-long watercolor class in San Francisco with Alvaro Castagnet, a fantastic Uruguayan painter.  It was hosted by Tracy Culbertson of Art in the Mountains, a company based out of Oregon.  She did a great job, and was very helpful.  The above paintings were some of what I did by the last day of class.  It was a long road getting there!   

 Alvaro (who lived in Australia for many years) is often known in conjunction with a group of Australian painters who all share a fresh, loose style of watercolors, including Joseph Zbukvic and Herman Pekel, amongst others (two other painters I love!).  Here’s Alvaro's Facebook page, where you can see some of his current work, but this is the sort of stuff he does in general.


So how was the class as a whole?  Wonderful!  Exhausting and invigorating!  More challenging than I thought it would be.  Disheartening at times, but confidence building by the end.  Above all, boundary-expanding.  In essence- easily, EASILY worth the time and money.  We broke the piggy bank for this, and I took both 3-day sessions they offered, for a total of about 1000$.  I called in favors and babysitters, etc.  I figured, “Hey, I love Alvaro’s work, he’s in SF, and I don’t have to pay for a hotel or flight.  What the hell.  I oughta go for the whole thing.”  It was a decision I’ll never regret. 

Alvaro’s really a virtuoso painter, in command of the medium, with an exuberant, confident approach.  Just watching him paint again and again over the course of the week, asking questions and picking his brain once each piece was finished, etc. was, in and of itself, an incredibly educational experience.  Alvaro said more than once that he believes the best teaching tool he can offer is for us to watch him paint, and for him to answer our questions about his painting process, and I agree.  Each class had about 20 people in it, so I got to rub elbows with a lot of different painters too, which was also really invigorating.  People came from all across the country to take his class.  One woman even came from Tokyo!!  I felt very privileged to live so close to SF.

The class was based out of the Raddison Hotel, up by Pier 39.  We would either meet there or on location in SF at around 900 am.  Alvaro would do a painting at that day’s site (China Town, Embarcadero, Union Square, etc), which took about an hour, and then we would do a few paintings of our own and eat lunch, while he went around and gave us on-the-spot pointers.  After lunch, Alvaro would paint again, and we would pick his brain some more on his process and techniques.  Finally, he would end the day by giving group critiques—sometimes on site, but more often back at the hotel.

It may not sound like a breezy, mellow time, painting the days away, but it was actually a very, very busy schedule-- full to the brim!  My head was spinning with art, sketches, painting ideas, new lessons, meeting new people, etc.  I’ve never sketched or painted so intensively in my whole life. 

They make it pretty clear in the literature, and Alvaro says so himself, but he is not “a spoon-fed teacher”.  It’s not that he keeps secrets.  He’s perfectly happy to share stuff, but he’s not the type to talk a lot while painting, taking apart his process.  If you’re an active learner though, and know how to pay attention, ask the right questions, and can learn through attentively watching and then doing/ failing/ exploring on your own, you can get a  lot out of a class of his.  I know I did.

Alvaro himself is a charming, funny guy.  Very boisterous.  But sometimes grumpy or sharp.  Clearly not a morning person.  LOL.  I appreciated that, in the end—he felt like he wasn’t acting, but was who he was.  He always dressed very stylishly too!  Hahaha.  But it’s true!  What can I say?  The man knows how to where a nice pair of shoes and a good shirt.  We also got to meet his wife, Ana Maria, as well, who was incredibly charming, and his two kids. 

Alvaro’s critiques were full of humor, but were, frankly, very direct and cut to the bone of each painting’s issue.  I’m sure some would label the crits as harsh.  There was no pussy-footing around.  He gave praise too, of course, mostly on how people improved bit by bit, but I could see how he might have stepped on the toes of some people.  I appreciated the frank critiques, honestly.  I paid to have a world-class painter help teach me as much as he could in just a week, and I wasn’t interested in a gentle “that’s nice” sort of approach.  I wanted to be pushed.  Of course, there are a lot of ways to teach, and I’m sure others might prefer a different approach, but it was what Alvaro had to offer and it fell in line exactly with the kind of direct, vibrant personality he had, so I took it and worked with it.

I’ll follow up in the next few posts with more of my own paintings from the class, how the workshop related directly to me as an artist, and some quotes and thoughts of Alvaro’s on painting.  There was so much to learn!  I hope this ends up being useful to someone else too.  :)